Integrate Zoom Meetings in React Js and Python: A Step-by-Step Guide
A comprehensive guide to integrating Zoom meetings into your React web user-level application. #react #zoom #django #python


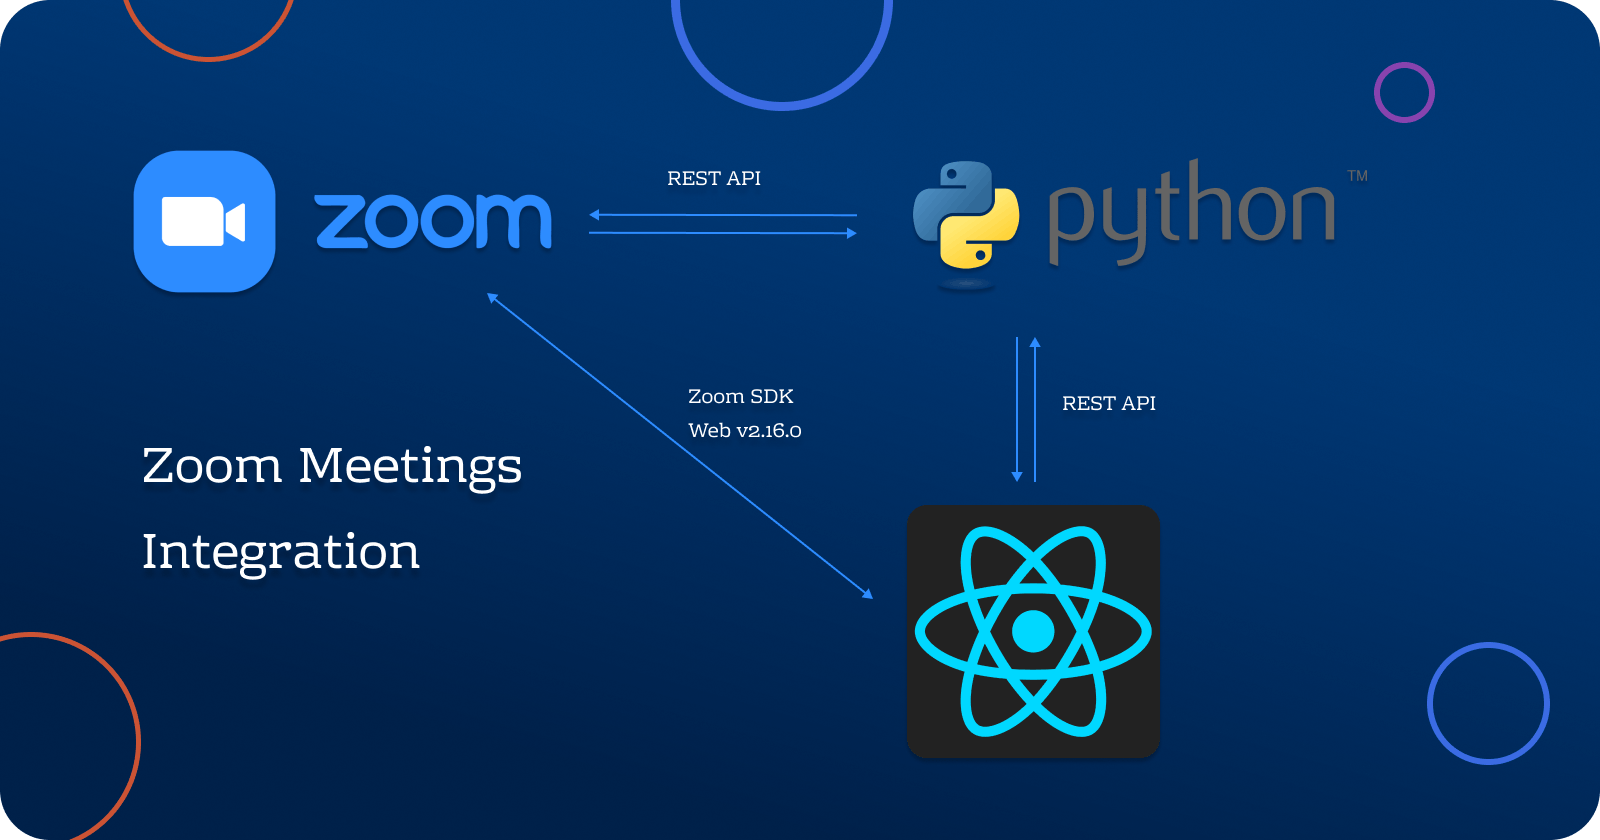
This comprehensive guide takes you on a journey through the intricate process of integrating Zoom Meetings, the renowned video conferencing platform, into your web application built using React and Python REST API. This guide offers a step-by-step roadmap.
In this blog, we'll break down our discussion into two distinct parts: the Backend and the Frontend. Our approach involves leveraging powerful frameworks to streamline development. For the Backend, we'll harness the capabilities of Django to craft robust RESTful APIs, while on the Frontend, we'll turn to the dynamic capabilities of ReactJS. This two-part exploration will guide you through the intricacies of backend and frontend development, ensuring a comprehensive understanding of both aspects.
Before diving into the process of Zoom integration, it's imperative to thoroughly review the Zoom integration documentation and carefully examine the associated terms and conditions. This initial step is crucial in ensuring a smooth and compliant integration experience.
Understanding the Zoom integration documentation is akin to unlocking the gateway to seamlessly incorporating Zoom's powerful video conferencing capabilities into your React web application. This comprehensive guide, provided by Zoom, serves as your roadmap, offering insights into the technical aspects, best practices, and functionalities available for integration.
By taking the time to delve into this documentation, you equip yourself with a fundamental understanding of the integration process. You'll gain insights into how Zoom's APIs and SDKs work, enabling you to harness their full potential. This knowledge will not only empower you to make informed decisions during the integration but also troubleshoot any potential issues that may arise along the way.
Furthermore, reading and comprehending the terms and conditions associated with Zoom integration is essential to ensure that your integration efforts align with Zoom's policies and guidelines. It's a responsible practice that safeguards both your project and your users. These terms and conditions outline the rules, limitations, and responsibilities associated with using Zoom's services and technologies. Adhering to them not only promotes a compliant integration but also fosters trust and credibility.
In summary, before embarking on your Zoom integration journey, invest the time to thoroughly review the Zoom integration documentation and diligently scrutinize the terms and conditions. This proactive approach will equip you with the knowledge, insights, and legal compliance necessary to create a successful and ethically sound integration of Zoom into your React web application. By doing so, you set the stage for a collaborative and engaging user experience while ensuring that your project adheres to established standards and guidelines.
🎯 Mmm; Enough happened! Let's start
Part 1- Backend
We'll use Django and Restframework here
Create a directory django_app and activate the virtual env
$ mkdir django_app
$ cd django_app
$ django_app> python -m venv env   # create virtual environment
$ django_app> ./env/Scripts/Activate    # activate virtual environment
(env) $ django_app> pip install django djangorestframework
Create a Django project
(env) $ django_app> django-admin startproject django_app .
I have created a django_app project. Please setup the Django project with djangorestframework Go to the official documentation to configure the Django app. And run the server python manage.py runserver
Now install the dependency library zoomus. It has all the required methods we'll use. and create an app zoomapp using django-admin command
(env) $ django_app> pip install zoomus
(env) $ django_app> django-admin startapp zoomapp
Add zoomapp in your setting.py.
# Application definition
INSTALLED_APPS = [
    'django.contrib.admin',
    'django.contrib.auth',
    'django.contrib.contenttypes',
    ...
    'zoomapp' # this
]
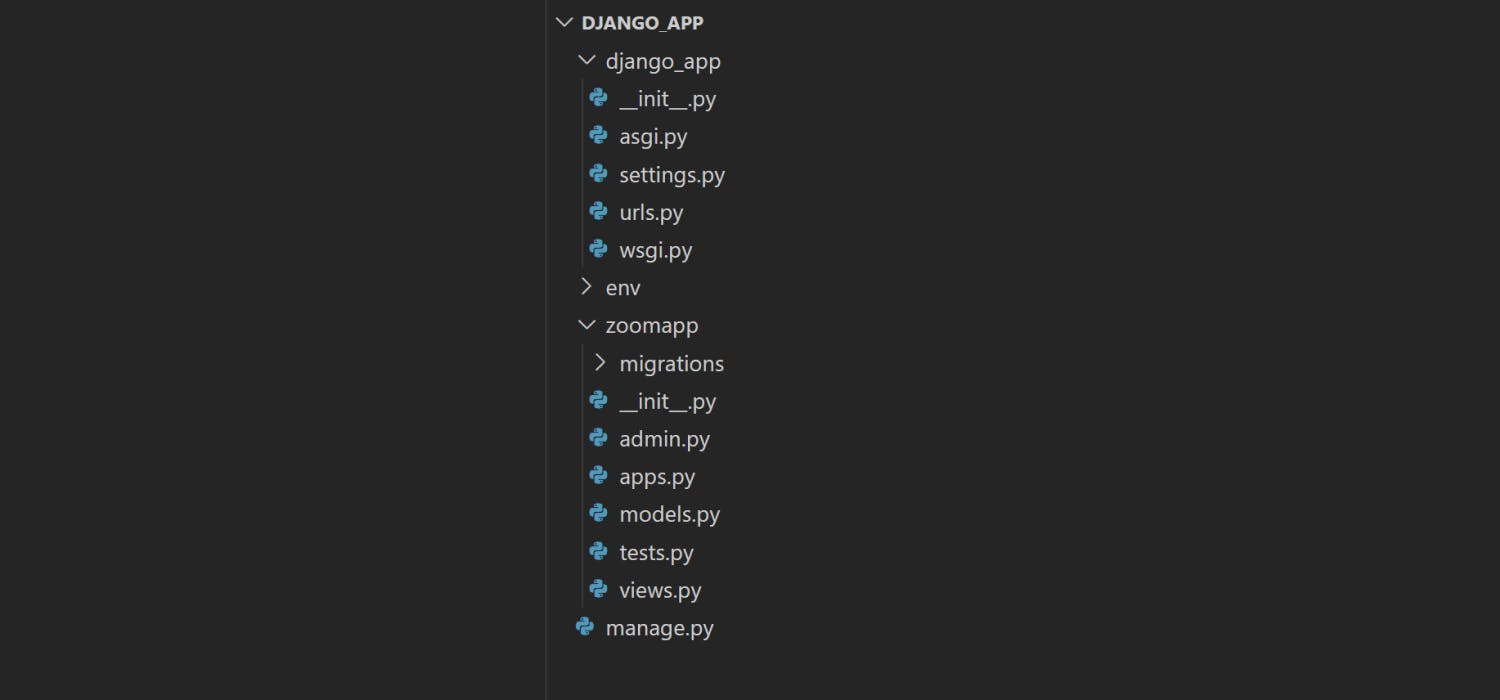
As a result, the directory tree will take on the following structure:
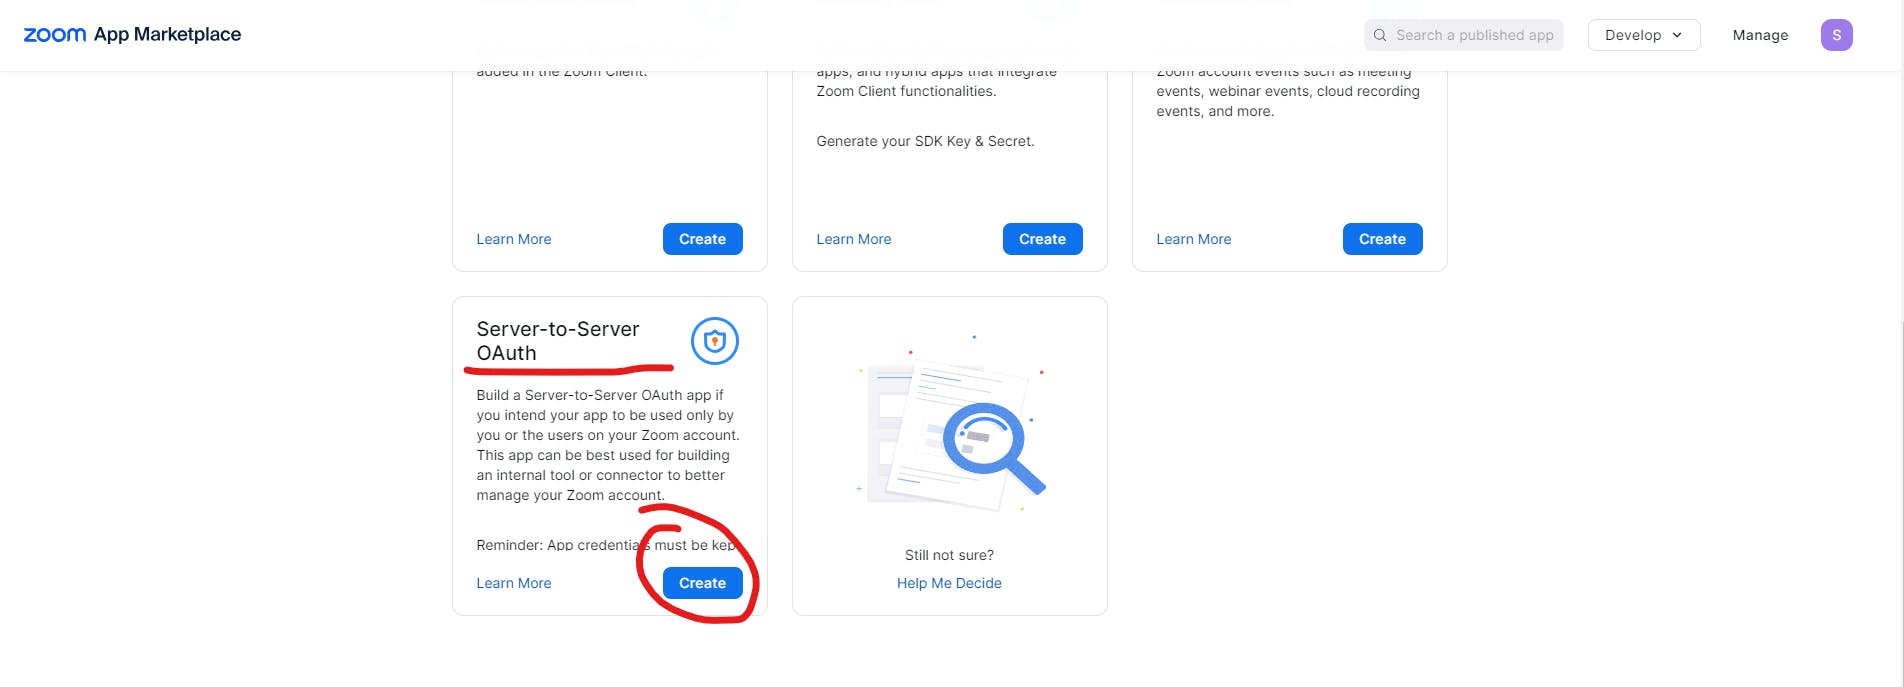
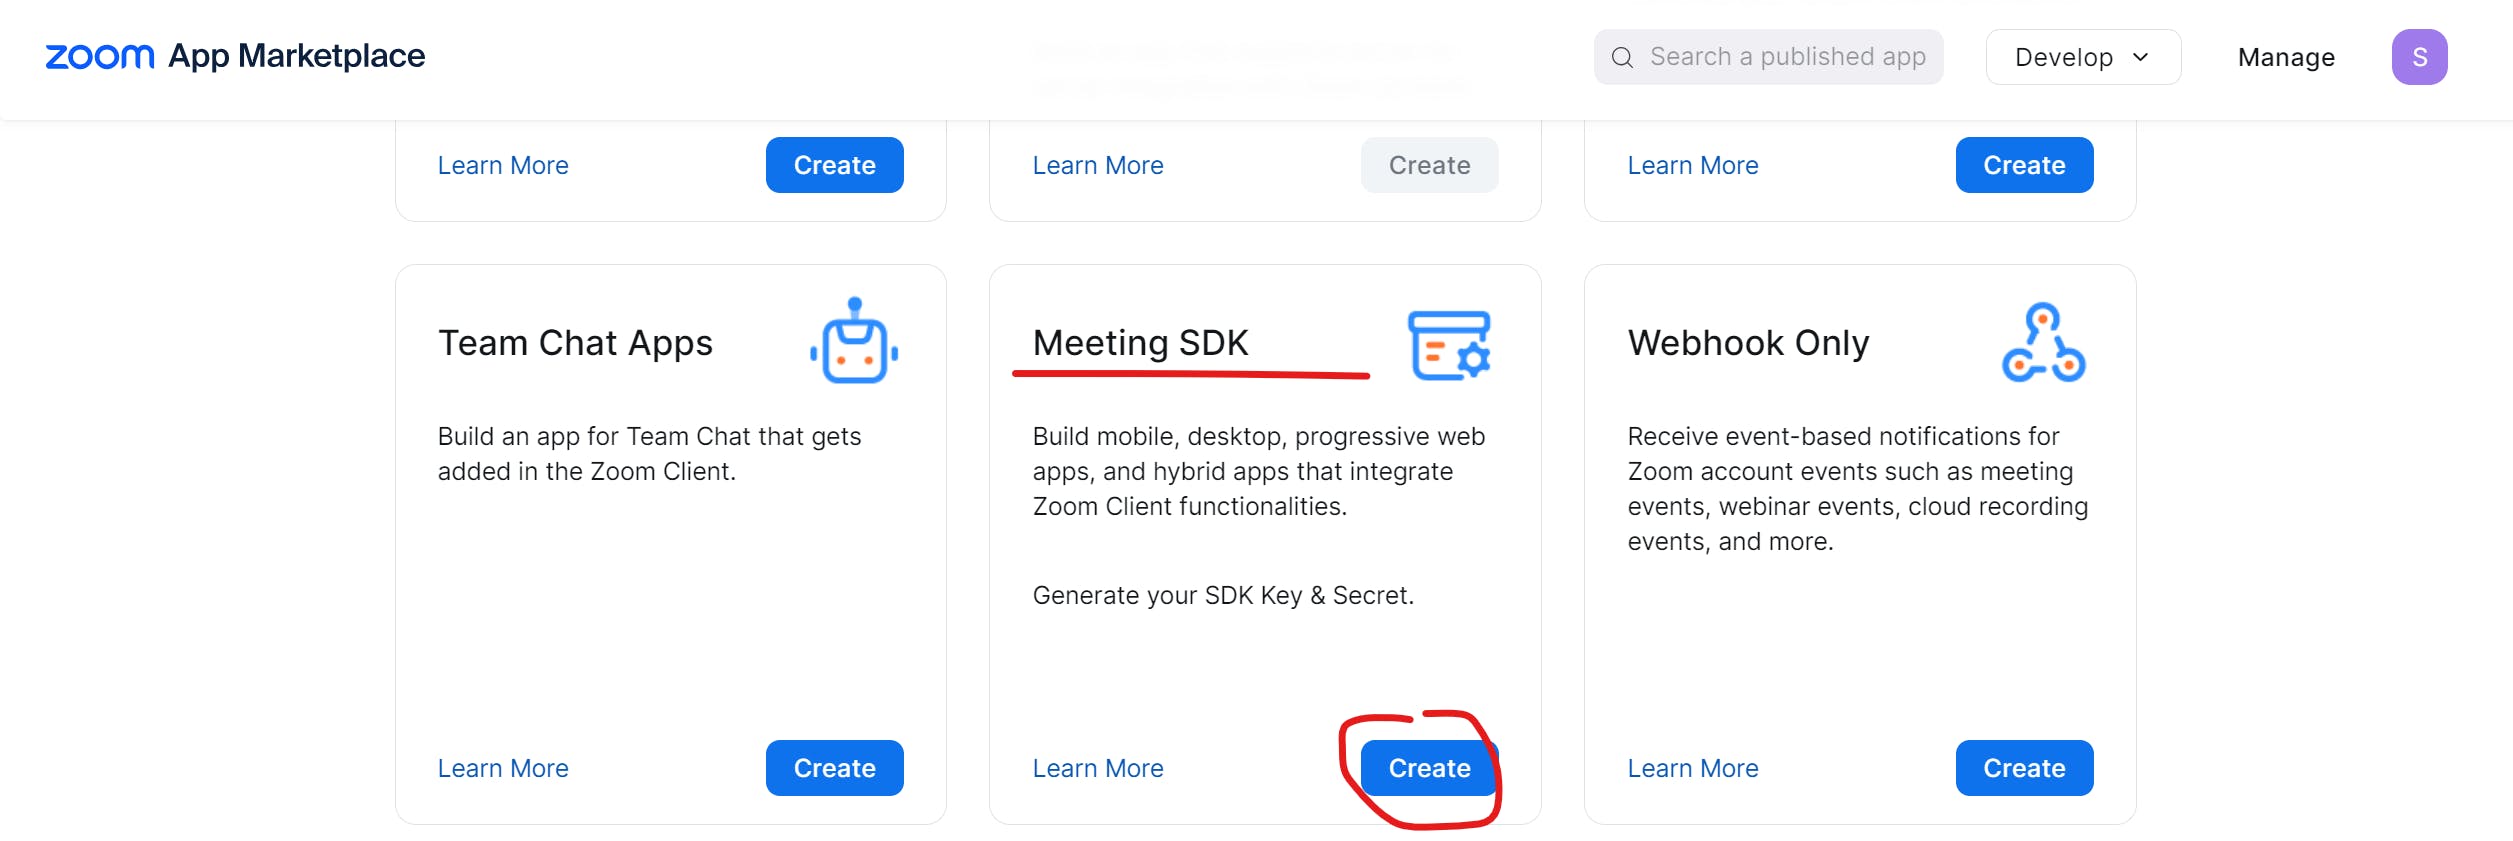
Now, let's navigate to the Zoom marketplace and sign in using your Zoom account credentials. Or sign up if you don't have a Zoom account. Now to create SDK app click on Develop and then choose Build App.

Server-to-Server OAuth App
In the SDK selection, choose Server-to-Server OAuth and click the Create button. For more details about the Server-to-Server OAuth app go to Zoom Integration doc.
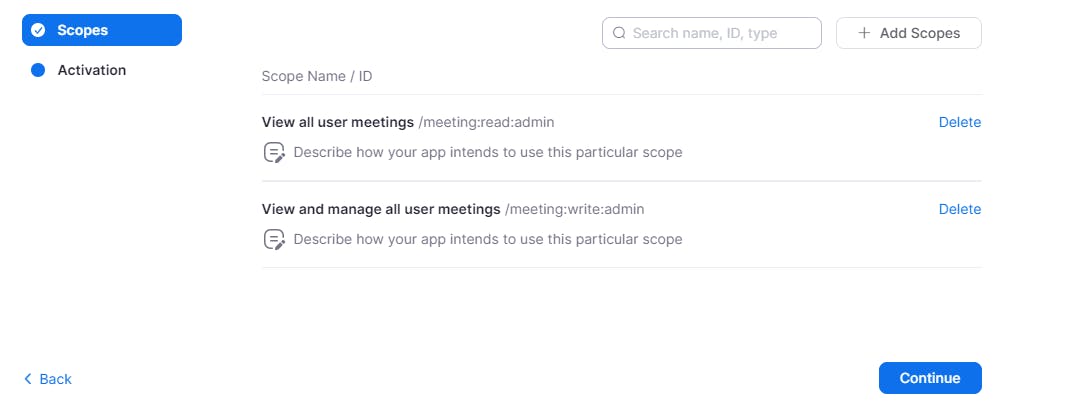
Now fill in the required details and follow the given steps. In the last step Activate the app. Please add the required scopes meeting:read:admin and meeting:write:admin
Once the app is activated, proceed to copy the App Credentials; Account ID Client ID and Client Secret
Now Let's come to the code and create a .env file to store confidential keys.
## .env
ZOOM_ACCOUNT_ID=MxglapFyQq-zjtPphfgRfw
ZOOM_CLIENT_ID=pjdGwZJJRoSvgghq9A
ZOOM_CLIENT_SECRET=XkxMP7yUfG0DVA7Q1ofghfgyt
Write 1st API- Schedule Meeting
Create a new file django_app/zoomapp/helper.py
from zoomus import ZoomClient
import os

CLIENT_ID = os.environ.get("ZOOM_CLIENT_ID", "")
CLIENT_SECRET = os.environ.get("ZOOM_CLIENT_SECRET", "")
ACCOUNT_ID = os.environ.get("ZOOM_ACCOUNT_ID", "")


def create_zoom_meeting(payload):
    """Go to zoom documentation https://developers.zoom.us/docs/meeting-sdk/apis/#operation/meetingCreate"""

    client = ZoomClient(CLIENT_ID, CLIENT_SECRET, api_account_id=ACCOUNT_ID)

    response = client.meeting.create(**payload)
    return response.json()
Open the file django_app/zoomapp/views.py and write your POST API
from django.shortcuts import render
from rest_framework.views import APIView
from rest_framework.response import Response
from rest_framework.permissions import IsAuthenticated
from .helper import create_zoom_meeting
from datetime import datetime
from rest_framework import status

# Create your views here.


class ScheduleMeetingView(APIView):
    permission_classes = [IsAuthenticated]

    def post(self, request, format=None):
        payload = request.data
        topic = payload['topic']  # Max 100 chars
        agenda = payload['agenda']  # Max 200 chars
        start_time = payload['start_time']  # %Y-%m-%d %H:%M

        # ensure the all required values are valid and formated as per zoom documentation

        data = {
            'topic': topic,
            'agenda': agenda,
            'start_time': datetime.strptime(start_time, "%Y-%m-%d %H:%M"),
            'topic': topic,
            'type': 2,
            # The type of meeting.
            #     1 - An instant meeting.
            #     2 - A scheduled meeting. (this)
            #     3 - A recurring meeting with no fixed time.
            #     8 - A recurring meeting with fixed time.
            'user_id': "me"  # For user-level apps, pass the me value.
        }
        response = create_zoom_meeting(data)
        # Store the response in the database for future reference.
        return Response({"message": "Meeting scheduled", 'res': response}, status.HTTP_201_CREATED)
Create a new file django_app/zoomapp/urls.py and add a route to your API
from django.urls import path
from .views import ScheduleMeetingView


urlpatterns = [
    path('meeting/create', ScheduleMeetingView.as_view())
]
Add app URLs to the project routes django_app/django_app/urls.py
from django.contrib import admin
from django.urls import path, include

urlpatterns = [
    path('admin/', admin.site.urls),
    path('api/', include('zoomapp.urls')), # this line
]
Create Zoom Web SDK App
We'll proceed by creating an additional API to authorize the user on the client side, which requires the creation of a Web SDK app in the Zoom Marketplace.
Please complete all the necessary information by following the steps provided, ensuring that you include the required scopes /meeting:read and /meeting:write . Copy the Client ID and Client Secret keys and add these secret keys to the .env file.
....
ZOOM_SDK_ACC_ID=iujkyewuDkjhdSDs
ZOOM_SDK_ACC_SECRET=XdsfkjhYjhfkhLKILuyFILKsj
Install the signature library PyJWT
pip install pyjwt
Write 2nd API- Authenticate the user at client side
Define a new method create_auth_signature in django_app/zoomapp/helper.py
from time import time
import jwt

def create_zoom_meeting(payload):
    ...
    ...

def create_auth_signature(meeting_no, role):
    ZOOM_SDK_CLIENT_ID = os.environ.get("ZOOM_SDK_CLIENT_ID", "")
    ZOOM_SDK_CLIENT_SECRET = os.environ.get("ZOOM_SDK_CLIENT_SECRET", "")
    iat = time()
    exp = iat + 60 * 60 * 1  # expire after 1 hour

    oHeader = {"alg": 'HS256', "typ": 'JWT'}

    oPayload = {
        "sdkKey": ZOOM_SDK_CLIENT_ID,
        # The Zoom meeting or webinar number.
        "mn": int(meeting_no),
        # The user role. 0 to specify participant, 1 to specify host.
        "role": role,
        "iat": iat,
        "exp": exp,
        "tokenExp": exp
    }

    jwtEncode = jwt.encode(
        oPayload,
        ZOOM_SDK_CLIENT_SECRET,
        algorithm="HS256",
        headers=oHeader,
    )
    return {'token': jwtEncode, 'sdkKey': ZOOM_SDK_CLIENT_ID}
Open the file django_app/zoomapp/views.py and write your 2nd POST API MeetingAuthorizationView
class ScheduleMeetingView(APIView):
    ...
    ...

class MeetingAuthorizationView(APIView):
    permission_classes = [IsAuthenticated]

    def post(self, request, format=None):
        payload = request.data
        meeting_no = payload['meeting_no']
        role = payload['role'] # The user role. 0 to specify participant, 1 to specify host.

        # find the meeting details saved in the database
        password = "db.meeting.password"

        response = create_auth_signature(meeting_no, role)
        response['meeting_no'] = meeting_no
        response['password'] = password
        return Response(response, status.HTTP_200_OK)
Add a new route in the django_app/zoomapp/urls.py
from django.urls import path
from .views import ScheduleMeetingView, MeetingAuthorizationView

urlpatterns = [
    path('meeting/create', ScheduleMeetingView.as_view()),
    path('meeting/authorize', MeetingAuthorizationView.as_view()),
]
Now we have made two APIs
/api/meeting/create # to create a meeting
/api/meeting/authorize # to authorize as Zoom user on the client side
Part 2- Frontend
The host will initiate the Zoom meeting, and participants can join without the need for registration. We'll use /api/meeting/authorize API to authenticate the user as Host or Participant.
Create React App
$ npx create-react-app meeting-app
$ cd meeting-app
$ npm install @zoomus/websdk --save
$ npm install
We've already set up the react meeting-app and installed the Zoom Web SDK. To ensure everything is in place, let's also complete the router setup.
Create a Schedule meeting component
Once that's done, go ahead and create a 'ScheduleMeeting.jsx' file to create a meeting.
import React, { useState } from 'react';
import axios from "axios";
function ScheduleMeeting() {
const [topic, setTopic] = useState(null);
const [agenda, setAgenda] = useState(null);
const [startTime, setStartTime] = useState(null);
const scheduleAPI = async () => {
await axios({
method: 'get',
url: `http://localhost:8000/api/meeting/create`,
data: { topic: topic, agenda: agenda, start_time: startTime }, // YYYY-MM-DD hh:mm
headers: {
Authorization: "your auth token here"
}
}).then(res => {
console.log("Meeting successfully created!")
}).catch((err) => {
console.log(err)
})
}
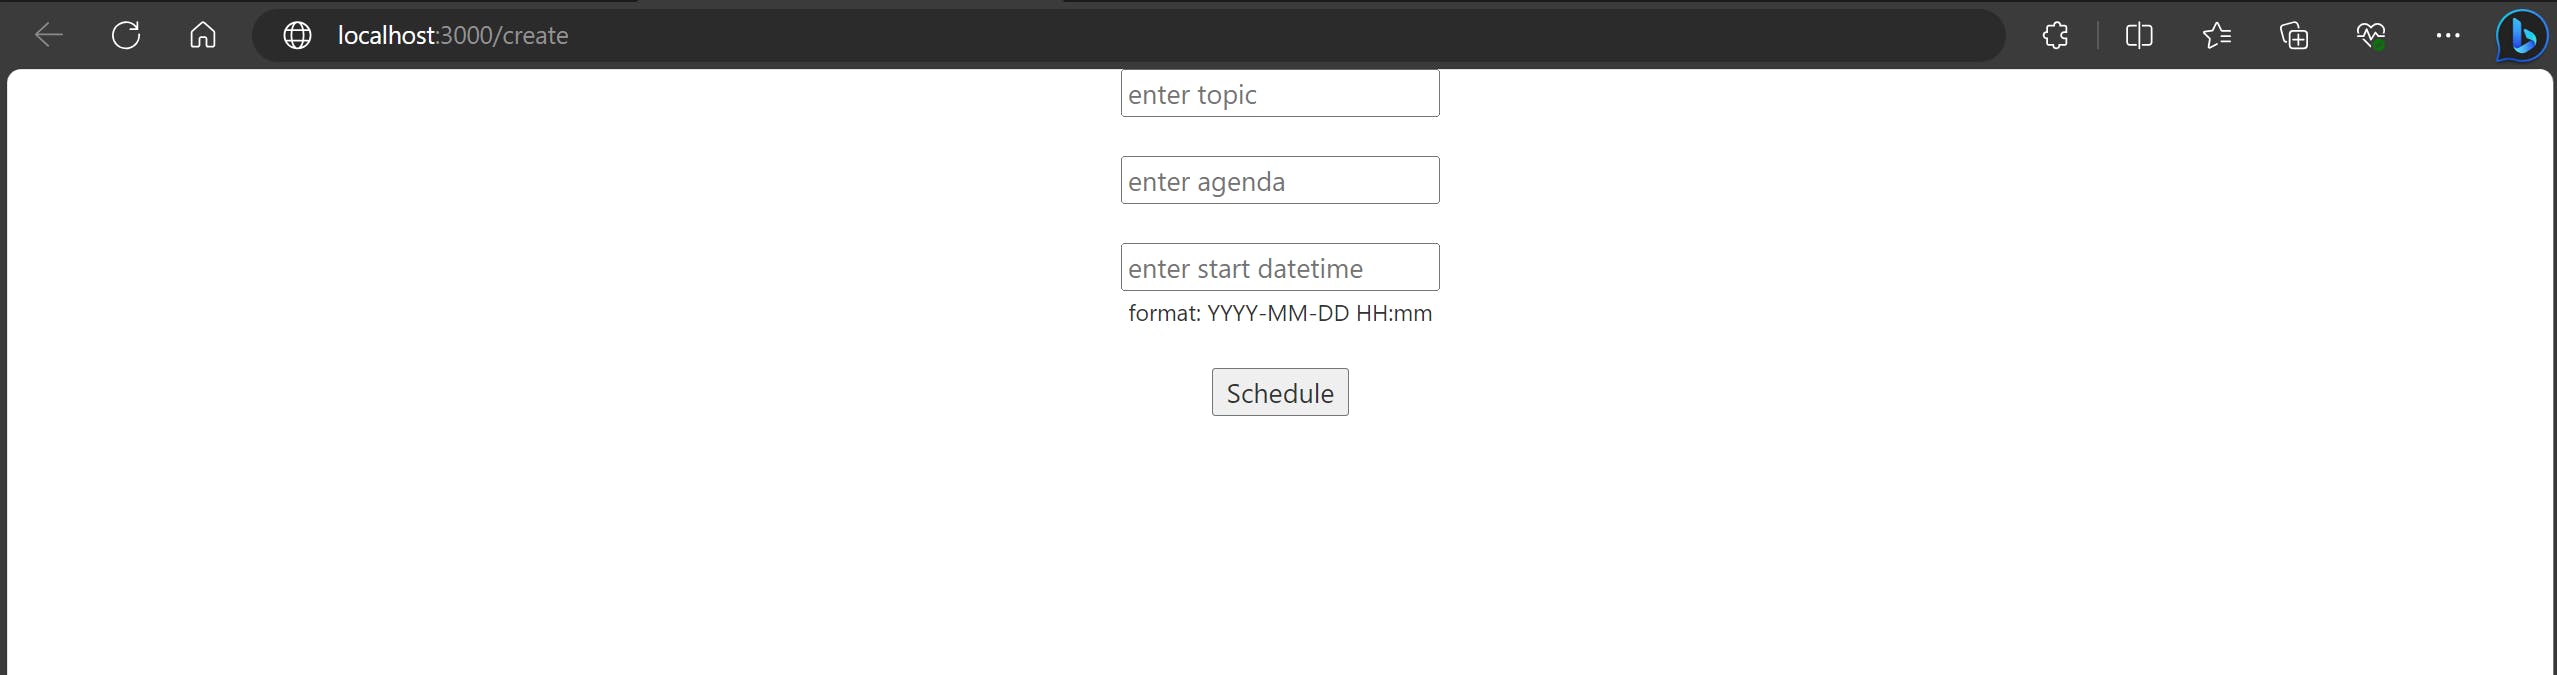
return (
<div style={{ textAlign: "center" }}>
<input onChange={(e) => setTopic(e.target.value)} placeholder='enter topic'></input> <br /><br />
<input onChange={(e) => setAgenda(e.target.value)} placeholder='enter agenda'></input><br /><br />
<input onChange={(e) => setStartTime(e.target.value)} placeholder='enter start datetime'></input><br />
<small>format: YYYY-MM-DD HH:mm</small>
<br /><br />
<button onClick={scheduleAPI}>Schedule</button>
</div>
);
}
export default ScheduleMeeting;
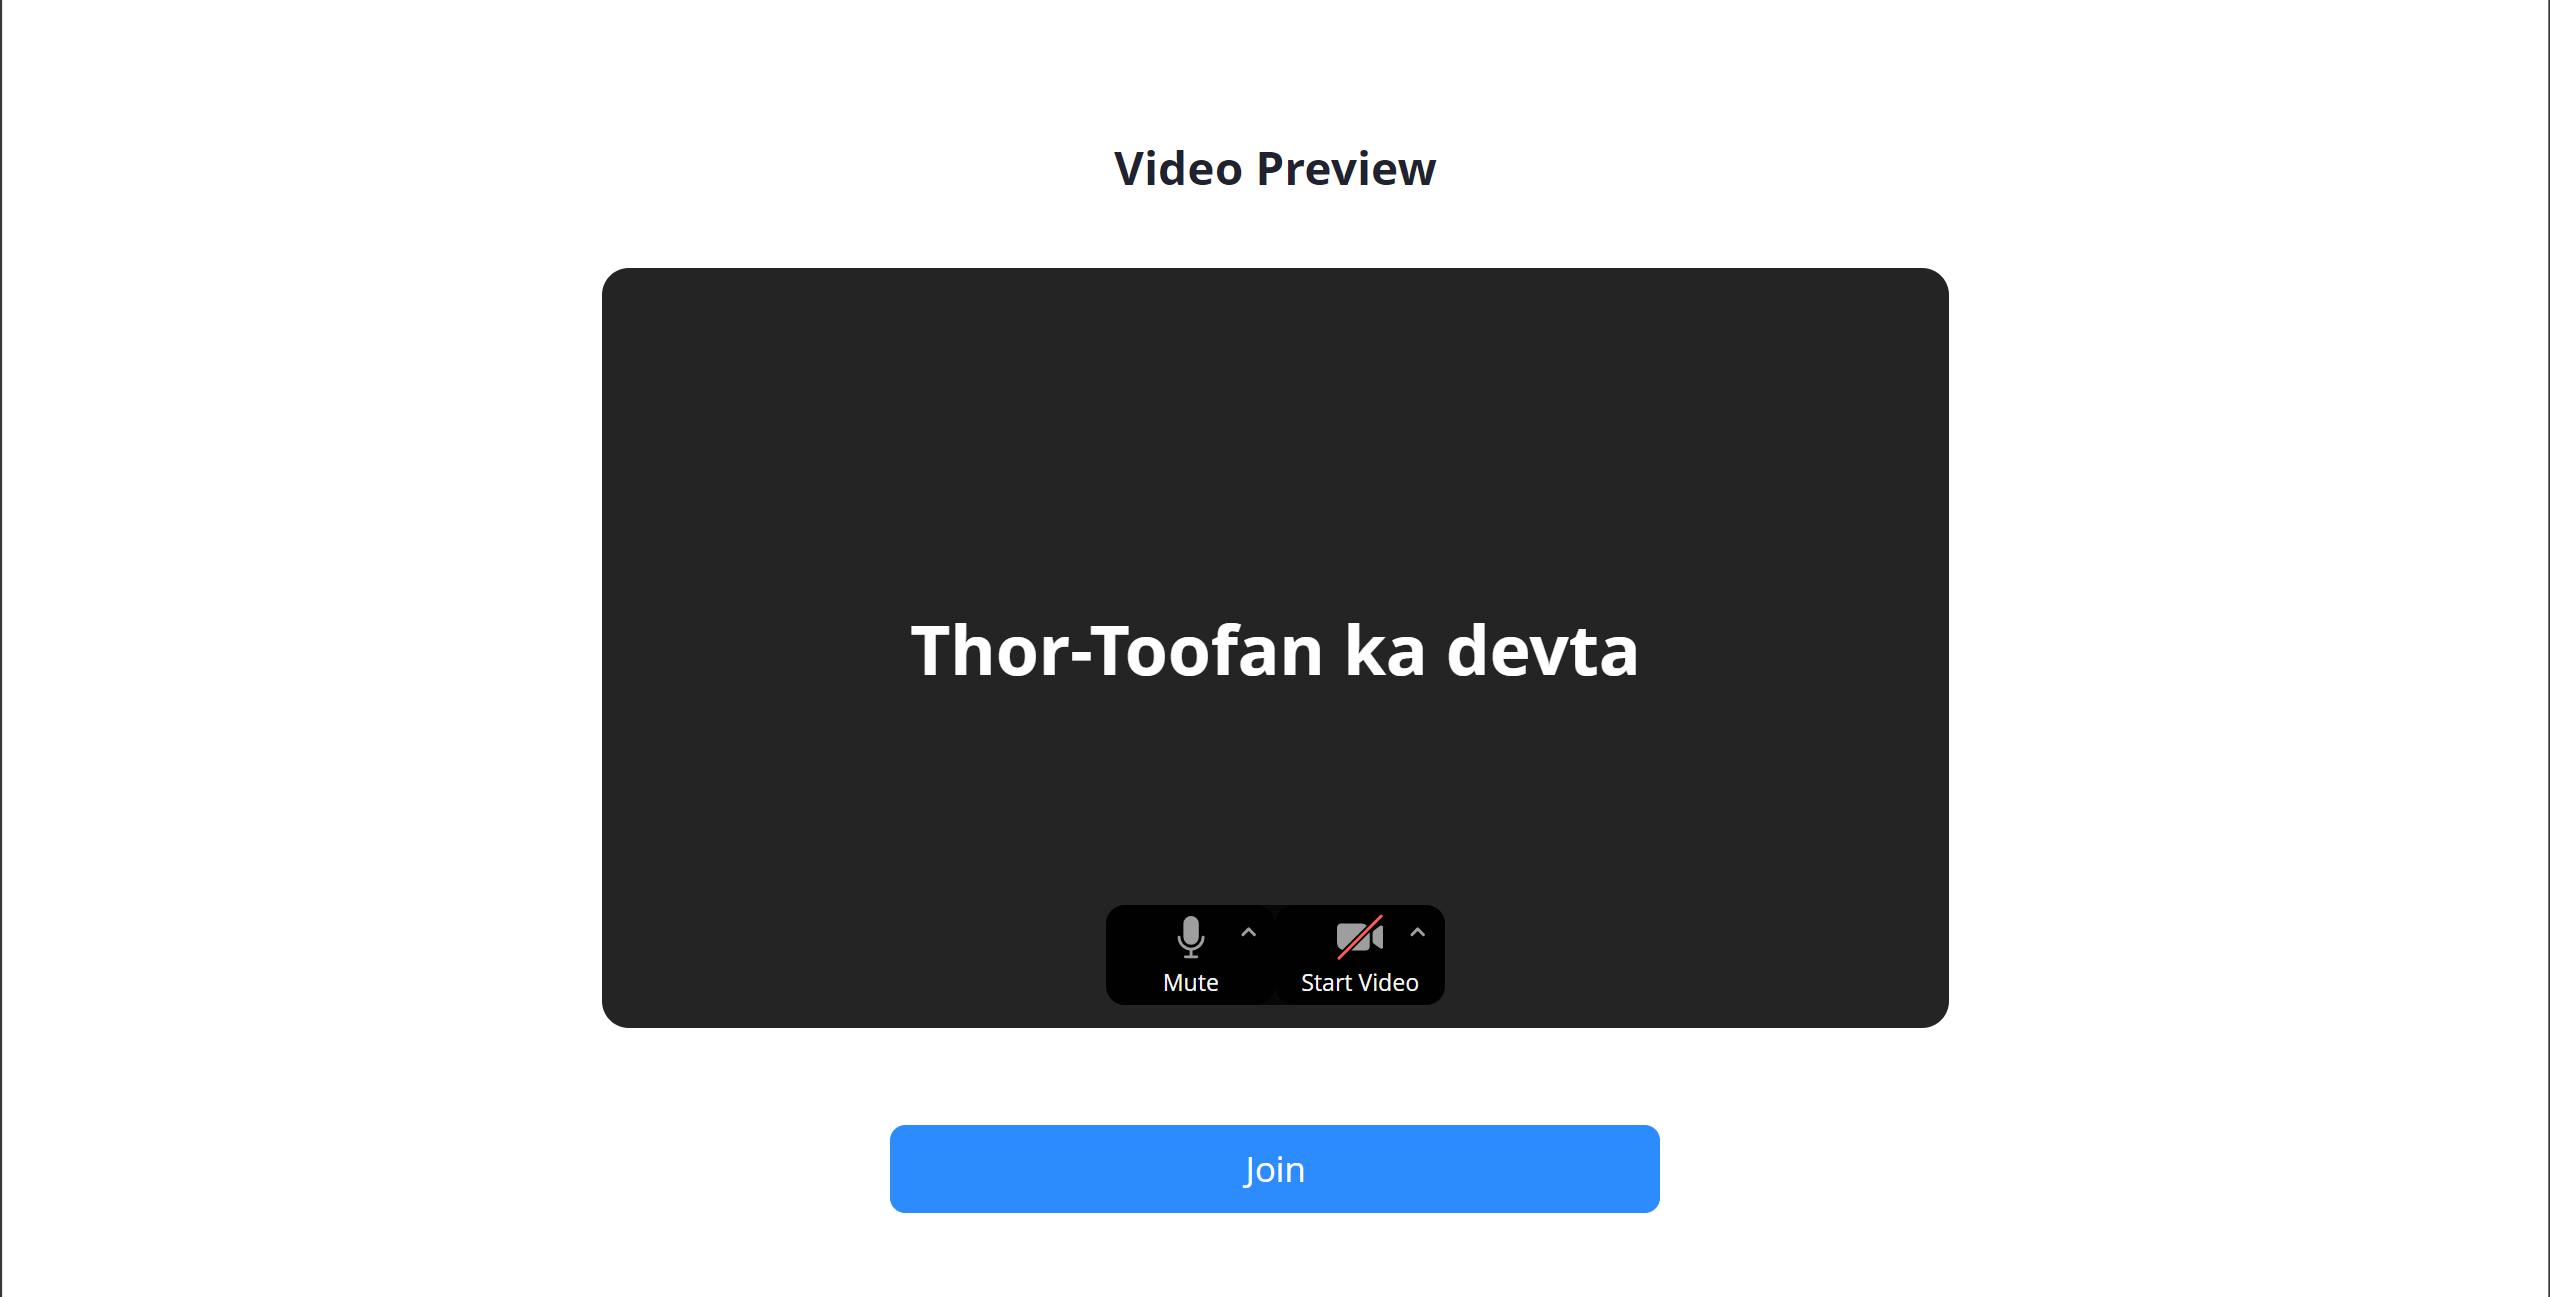
Run your project and schedule a meeting following the UI instructions provided above. Now copy the meeting_no and password from the Zoom meeting dashboard.
Create a join meeting component
By the going ahead create a 'MeetingComponent.jsx' file to get started with the task.
import React, { Fragment, useEffect, useState } from "react";
import axios from "axios";

var userEmail = "Thor-Toofan ka devta"
var registrantToken = ''
var zakToken = ''
var leaveUrl = `http://localhost:3000`

const antIcon = <LoadingOutlined />;

const MeetingComponent= () => {

    useEffect(async () => {
        getSignature();
    }, []);

    const getSignature = async () => {
        await axios({
            method: 'get',
            url: `http://localhost:8000/api/meeting/authorize`,
            data: { meeting_no: 12345678901, role: 0 }, // 0 = participant, 1 = host.
            headers: {
                Authorization: "your auth token here"
            }
        }).then(res => {
            const data = res.data.data;
            initMeeting(data);

        }).catch((err) => {
            console.log(err)
        })
    }

    const initMeeting = async (data) => {
        const { ZoomMtg } = await import('@zoomus/websdk');
        ZoomMtg.setZoomJSLib('https://source.zoom.us/2.16.0/lib', '/av');

        ZoomMtg.preLoadWasm();
        ZoomMtg.prepareWebSDK();
        // loads language files, also passes any error messages to the ui
        ZoomMtg.i18n.load('en-US');
        ZoomMtg.i18n.reload('en-US');

        ZoomMtg.init({
            leaveUrl: leaveUrl,
            success: (success) => {
                ZoomMtg.join({
                    signature: data.token,
                    sdkKey: data.sdkKey,
                    meetingNumber: data.meeting_no,
                    passWord: data.password,
                    userName: userName,
                    userEmail: userEmail,
                    tk: registrantToken,
                    zak: zakToken,
                    success: (success) => {
                        console.log(success)
                    },
                    error: (error) => {
                        console.log(error)
                    }
                })

            },
            error: (error) => {
                console.log(error)
            }
        })
    }

    return (<Fragment> </Fragment>
    );
}
export default ZoomMeteingView;
✅✅ Great job! You're all set now! Begin your React project by running 'npm start.' Once you do, you'll be greeted with a video preview page, ready to initiate your meeting.
🔥🔥🔥 💯
Summary:
This comprehensive guide on integrating Zoom meetings into your React web application was divided into two distinct parts. In Part 1, we delved into backend development. First, we walked you through the process of creating a Django app, setting the stage for seamless integration. Then, we explored the intricacies of establishing both a Zoom Server-to-Server SDK OAuth App and a Zoom Web SDK OAuth App, ensuring your backend was fully equipped to manage Zoom functionality.
In Part 2, we shifted our focus to the frontend. Here, we guided you through creating a React app that seamlessly incorporated Zoom meetings. We demonstrated how to design a dedicated page for scheduling meetings, streamlining the process for your users. Additionally, we showed you how to create another page dedicated to starting meetings, ensuring a user-friendly experience from beginning to end.
By the end of this two-part journey, you gained the knowledge and tools needed to successfully integrate Zoom meetings into your React web application, enhancing its collaborative capabilities and user engagement.
💖💝🎯
Thank you for taking the time to explore my blog. I appreciate your interest in my content, and I hope that this blog has been a valuable resource in enhancing your understanding of this integration process.
Once again, thank you for being part of this community of learners. I look forward to bringing you more insightful content in the future. Happy coding! 👨💻"
Best regards,
Abhay Braja